Monday, September 5, 2011

HTC Desire S – Download & Install Radio based on Location by http://go.to/drmobiles

HTC Desire SRooted your HTC Desire S phone and on a custom ROM you need the stock Radio image for your phone? If YES! Then your wait is over as Radio images extracted from official HTC updates are now available. The updates were location specific and the Radio images are as follows:

  • From Europe RUU, Saga HTC Europe 1.28.401.1 for HTC Build 1.28.401.1
  • From Australia RUU, Saga Telstra WWE 1.36.841.3 for HTC Build 1.36.841.3
  • From China RUU, Saga HTCCN CHS 1.43.1400.1 for HTC Build 1.43.1400.1

DOWNLOAD:
The Radio images are available and to download click HERE.

In order to use the Images simply follow the following guide. Before you begin make sure that you have backup of your important data from the phone. You are now about to install the Radio image that means that your phone is Rooted and you have the required drivers installed on your computer. If you need the USB drivers for your HTC Desire S, you can download the drivers from HERE.

Step 1:
Download the Radio image and rename the downloaded image as ‘PG88IMG.zip’.

Step 2:
Now copy the file ‘PG88IMG.zip’ to your SD card from your computer through USB connection.

Step 3:
Turn OFF your phone.

Step 4:
Boot your phone in to Recovery mode (hdboot) by pressing and holding down ‘volume down’ and ‘power button’.

Step 5:
The Boot loader will ask you for installation of radio.img.

Step 6:
Simply confirm the prompt and continue with the installation.

Step 7:
Reboot the phone.

Step 8:
Delete the image file from SD card or rename it in order to avoid further notifications and unplanned installation.

When you finish with the steps, the installation is complete and now your phone has updated stock radio image.

This post is sponsored byDr Mobiles Limited
1 Huron Street, Takapuna, North Shore 0622Tel: (09) 551-5344 and Mob: (021) 264-0000
Web FaceBook - Localist Posterous - Twitter - Blogger - Flicker  - Map - Email 
Uploaded via Apple iPhone 4!
Why Dr Mobiles Limited?
The only professional repair centre who DOES NOT charge inspection fees on faulty phones.
> No inspection fee at all!
> 1 hour iPhone 4 repair
> Repair while you wait
> Free 30 min parking
> Free loan phone

How to Install Android OS on HTC Universal Windows Phone? http://go.to/drmobiles

htc logoHTC Universal is a Windows based Pocket PC phone was the first 3G Pocket PC phone. It was sold by a number of vendors all over the world and it has been six years since its launch in 2005. The XDA Developers forums members re called the old handset as they were successful in their project by installing Android 2.2 Froyo on HTC Universal. The projected carried out by them for almost a year is revealed by them at the forums.

The following functions are working in Android 2.2 Froyo installed HTC Universal – Kernel v2.6.36, Lcd, Keyboard, SD card slot, Max1587a, Asic3 Buttons, Automatic screen rotation, Touchscreen, Bluetooth, Usb host, Backlight, Adb and Usb mass storage, M24C08 Eeprom, Keyboard and button backlights, RTC8564, Led’s Red, Green, Blue, and vibrate, AC Charging, Wifi, Bfq, Bfs, Slqb, Interactive + smartass cpu governor, Classic rcu, Root support, Support for EXT4 filesystems, Phone, Audio no input from mic and routing information. Unfortunately there weren’t able to successfully test Data connection through 3G or GPRS and camera, power management.

For installing Android 2.2 on HTC Universal you need to have one spare SD card with at least 250 MB so you can use your old SD cards if you have or else purchased it with the least memory size. The following the procedure mentioned below-

The first step is to create the following two partitions on your SD card –

  • /dev/sdb1  – 40 MB with FAT32
  • /dev/sdb2  – 150 MB with EXT4

The root partition will be EXT4 and if you have larger size for that, it’s good.

Download and copy the content from Zimage.zip & Zimage-host.zip to your FAT32 partition on your SD card. It have the following files

  • default.txt (HaReT configuration)
  • zImage (the kernel)
  • haret-0.5.2

And the following file has to be added to the root filesystem i.e., EXT4 partition –

Download froyo rootfs & copy it

Download other rootfs & copy it

Use the following command to extract the files

# sudo tar zxf froyo.tar.gz -C /media/(location of memory card)

Now you need to ensure that your Wi-Fi is OFF and you are not in airplane mode. Your phone should be ON along with Bluetooth.

Now start the haret-0.5.2 executable from WimMo and then press RUN.

The following settings needed to make it run close to a maximum speed –

  1. From Settings navigate to display and turn off animations and adjust the screen timeout.
  2. After hitting the keyboard menu button select ADW settings: Screen preferences: turn off orientation sensor and put the desktop scrolling speed at 400 or less. Drawer Settings: Turn off animated drawer.
  3. Select the app advance task killer, then go to settings followed by auto kill level then to aggressive and then set security level to medium.

For host you need to have USB to mini USB cable (like this) and USB hub (like this), you will need a kernel with host support enabled and drivers for the USB devices.

This post is sponsored byDr Mobiles Limited
1 Huron Street, Takapuna, North Shore 0622Tel: (09) 551-5344 and Mob: (021) 264-0000
Web FaceBook - Localist Posterous - Twitter - Blogger - Flicker  - Map - Email 
Uploaded via Apple iPhone 4!
Why Dr Mobiles Limited?
The only professional repair centre who DOES NOT charge inspection fees on faulty phones.
> No inspection fee at all!
> 1 hour iPhone 4 repair
> Repair while you wait
> Free 30 min parking
> Free loan phone 

Some cool Android tips and tricks that you might not know! http://go.to/drmobiles

Easy Setup

As Android is a open source platform, that means that you might be installing new firmware more frequently and everytime you would be required to setup the phone. Here is the quick guide on the must have apps for your mobile phone setup.

Import Contacts

With Android powered by Google handset you can easily import your contacts from your old mobile phone. Its simple procedure, you need to export contacts from your old mobile phone in CSV format and them import them to Google Contacts.

Now got to your Google Contacts in your new Android mobile phone and click on sync. Within few minutes your phone would be synchronized with Google Contacts and you will have your contact on to your mobile phone.

Facebook & Twitter

You can’t imagine or avoid Social Networking connect, Facebook and Twitter apps are must, so install them. Now select import data on your existing contacts. It will import pictures and other data automatically on to your contacts.

You should ensure that you have set the option to update Twitter & Facebook once every two hours or four hours to prevent the draining of your battery. The Facebook sync settings is in Contacts > Settings.

Antivirus Free

Antivirus Free is an Android application available for free purchase from the Android market. What is does is, scans for known malicious threats from the file and apps that you install or download on to your mobile phone.

An antivirus program is must on your mobile phone and what could be better free program than Antivirus Free.

Home Screen

The home screen on your phone can be better organized with ADW launcher. With ADW launcher has the setting to change the number of home screens, apps scrolling either vertically or horizontally.

With 4.5/5, it’s among the best customization apps.

Home Screen Widgets

Install Beautiful widgets app which includes tons of free skins and many other options. This beautiful widgets includes clock + weather and more than 700+ free skins/ theme to change the look, feel of your clock, weather icon or toggle buttons.

Lost Mobile Security

In most cases you don’t lose your mobile phone by yourself however those incidents can happen to anyone anytime. The Contact Owner app for Android. If your mobile phone is lost then it will display the owner contact information or your friend’s info from the list with email, so that the person who has found your phone can contact you.

Phone Settings Automatically with Timerrific

The Timerrific is an Android app which uses your customized setting or GPS or phone battery level based changes automatically. If your battery level reaches a low level you can predefine to Off some features so that your can prolong your battery life to an extent.

It can change settings based on time and day. You also have settings to set your phone on vibrate at office/schools. You can also set No signal alert so that you don’t miss important calls.

Barcode Scanner

barcode scanner is must for Android. With Barcode you can find the product information with just quick scan on barcode, install apps with scanning on barcode and compare prices.

FourSquare

Foursquare is the best application to explore various things in your city and also to learn about places. This application is widely used by the Android lovers. You earn points and unlock badges for discovering new things in your city.

Ringdroid

Ringdroid is a ringtone based apps for your mobile phone. You can assign specific ringtone to a contact, you can edit any ringtome and compose them by yourself.


This post is sponsored byDr Mobiles Limited
1 Huron Street, Takapuna, North Shore 0622Tel: (09) 551-5344 and Mob: (021) 264-0000
Web FaceBook - Localist Posterous - Twitter - Blogger - Flicker  - Map - Email 
Uploaded via Apple iPhone 4!
Why Dr Mobiles Limited?
The only professional repair centre who DOES NOT charge inspection fees on faulty phones.
> No inspection fee at all!
> 1 hour iPhone 4 repair
> Repair while you wait
> Free 30 min parking
> Free loan phone 

Power User Tips and Tricks: How to Use Google Maps with Offline Navigation?

Google map navigation is used by almost all the internet users all around the world. Eventually, on Android mobiles there is no way to navigate maps without internet connection. But, even with online navigation users really find it difficult to locate places on their mobiles. We are providing you an easiest way to navigate maps in offline mode.

All you need is an Android mobile with RMaps app installed and a PC with Mobile Atlas Creator. Now just follow the below steps to make offline navigation.

  •  Extract the Mobile Atlas Creator zipped file and launch mobile atlas creator.exe file. Now you will be having map source list and choose Google Maps from it.
  • Using mouse just select the area you need and set one zoom level preference, click on ‘Add selection.

RMap

  • After the completing the above step, go to menu, click on atlas and convert atlas format to select Rmap SQlite format. Now, by clicking create atlas option your selection will be downloaded with your new map.
  •  Make connection to Android mobile and PC. Create a folder with name rmaps and add newly created maps in the root directory of your SD Card. Disconnect mobile and PC and open the Rmaps on your Android mobile. Go to menu and tap on settings to choose user defined maps. Now, select your new map and enable that.

Everything is done now and you can view the maps even in offline mode very easily and fast.

 Download Rmaps app:

Rmaps app is now available for free and you can download it from Android Apps Labs.

Otherwise, Scan below QR Code with the barcode scanner from your Android mobile and follow the instructions to download this app.
rmaps QR Code

This post is sponsored byDr Mobiles Limited
1 Huron Street, Takapuna, North Shore 0622Tel: (09) 551-5344 and Mob: (021) 264-0000
Web FaceBook - Localist Posterous - Twitter - Blogger - Flicker  - Map - Email 
Uploaded via Apple iPhone 4!
Why Dr Mobiles Limited?
The only professional repair centre who DOES NOT charge inspection fees on faulty phones.
> No inspection fee at all!
> 1 hour iPhone 4 repair
> Repair while you wait
> Free 30 min parking
> Free loan phone 

The Top Ten Repair you should not pay for (source: LifeHacker)

Tired of shelling out your hard earned money to repair things around the house?  Check out this links and save yourself bunch of money!  Happy reading, dudes!

_iphone_3g_audio_flex
This post is sponsored byDr Mobiles Limited
1 Huron Street, Takapuna, North Shore 0622Tel: (09) 551-5344 and Mob: (021) 264-0000
Web FaceBook - Localist Posterous - Twitter - Blogger - Flicker  - Map - Email 
Uploaded via Apple iPhone 4!
Why Dr Mobiles Limited?
The only professional repair centre who DOES NOT charge inspection fees on faulty phones.
> No inspection fee at all!
> 1 hour iPhone 4 repair
> Repair while you wait
> Free 30 min parking
> Free loan phone 

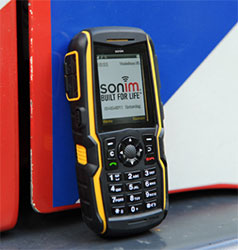
Sonim XP3300 Force officially pronounced toughest phone ever (world record, toughest, review)

The manufacturer of super tough cell phones Sonim just got another record under its belt. The company's XP3300 Force has just entered the Guinness book of records after surviving a free fall from over 25 meters.

The exact height from which the Sonim XP3300 Force was dropped was 25.29 meters (82 ft 11.67 in) and the surface it hit was concrete so it really is some achievement. Of course, just dropping your phone from such height isn't enough to book you a place in the Guiness book - it needs to go through the whole thing without sustaining operational damage.

And just to put things into perspective - the previous record-holder in this category was held by the JCB tough phone (again, Sonim-made), which reached just 3.25 meters. Talk about progress here.

You can check out the incredible stunt, performed by the Sonim XP3300 Force for yourselves in the following video.


This post is sponsored byDr Mobiles Limited
1 Huron Street, Takapuna, North Shore 0622Tel: (09) 551-5344 and Mob: (021) 264-0000
Web FaceBook - Localist Posterous - Twitter - Blogger - Flicker  - Map - Email 
Uploaded via Apple iPhone 4!
Why Dr Mobiles Limited?
The only professional repair centre who DOES NOT charge inspection fees on faulty phones.
> No inspection fee at all!
> 1 hour iPhone 4 repair
> Repair while you wait
> Free 30 min parking
> Free loan phone 


iPhone 5 Leaked News: 3.7-inch screen confirmed by the latest iOS beta?

While some of us are looking at the just released beta 7 of the upcoming iOS as a fresh delivery of bugfixes for our iPhones, some are taking a more serious approach to it. Obviously someone took the effort to go through most of the files (or at least the images) that the new release contains and stumbled upon this new generic icon (pictured right) that supposedly depicts the iPhone 5.

The giveaway is the rectangular home button that will, reportedly, replace the circle one in the next iteration of the iPhone. And since the image contains that altered button we assume it's also representative of the overall design of the next Apple smartphone.

Now if you analyze the image more carefully you see that it also carries a different screen-to-bezel ratio than the iPhone 4, which also corresponds nicely with latest rumors of a bigger screen. The new ratio means that the iPhone 5 will come with a 3.7" screen, assuming that it has the same surface of the front panel as its predecessor.

Of course, there are too many if's here to be able to take the whole thing without a pinch of salt, but it's the second time the 3.7" rumor comes up lately, so we guess its chances of coming true are increasing.

Reportedly, there are only a few weeks left before the official iPhone 5 announcement, so we won't need to wait too much longer to find out.


This post is sponsored byDr Mobiles Limited
1 Huron Street, Takapuna, North Shore 0622Tel: (09) 551-5344 and Mob: (021) 264-0000
Web FaceBook - Localist Posterous - Twitter - Blogger - Flicker  - Map - Email 
Uploaded via Apple iPhone 4!
Why Dr Mobiles Limited?
The only professional repair centre who DOES NOT charge inspection fees on faulty phones.
> No inspection fee at all!
> 1 hour iPhone 4 repair
> Repair while you wait
> Free 30 min parking
> Free loan phone